
Purpose
Virbela now offers several new application programming interfaces (API) to allow our customers to build Virbela into their business processes.
Postman documentation is available
here: https://documenter.getpostman.com/view/23022053/2s83zfQkaP.
Setting up the API
Virbela must provide customers with the proper client credentials to use our API suite. All of the APIs use the JSON file format.
Base URL
The base URL depends on the region where Virbela hosts the campus. Customers can determine their region based on their instance of app.virbela.com.
| Region | North America |
| App.virbela domain | app.virbela.com |
| API base URL | https://gateway-us.virbela.com |
| Product API URL | https://virbela-product-api.herokuapp.com |
| Region | Europe |
| App.virbela domain | app-eu.virbela.com |
| API base URL | https://gateway-eu.virbela.com |
| Product API URL | https://virbela-product-api-eu.herokuapp.com |
| Region | Australia |
| App.virbela domain | app-aus.virbela.com |
| API base URL | https://gateway-aus.virbela.com |
| Product API URL | https://virbela-product-api.herokuapp.com |
Authentication
Customers can use the same credentials for all API services they can access. Customers can update their credentials through the Virbela dashboard → world → integrations:
Currently, only one set of credentials is supported per campus. If an owner creates new credentials, the old ones will immediately cease working.
The API does not require any authentication, as the request headers contain the client ID and client secret:
V-Client-Id: xxxxxx,
V-Client-Secret: xxxxxx
While this information is required for all APIs, some may require additional information.
APIs to manage users
Virbela has several APIs to manage users within the world.
Create or update a user – POST {baseURL}/User/Invitation
This service allows customers to create new users or update existing users. Currently, the API only simultaneously supports creating or modifying a single user.
The body of the request will look like the following:
{
"email": "testuser@test.com",
"displayName": "TestUser" ,
"firstName": "Test" ,
"lastName": "User" ,
"title": "User for testing purposes" ,
"teamId": "A",
"permission": "moderator",
"sendInvitationEmail": "all"
"overwriteData": true
}
Below is more information on the individual fields:
| Element | Data Type | Required | Additional information |
|---|---|---|---|
| String | Yes | ||
| displayName | String | No | Display names are unique, but the invitation API will not know if a display name is already in use. If the display name is in use, random numbers will get appended to the display name to make it unique. |
| firstName | String | No | |
| lastName | String | No | |
| teamId | String | No, but if left blank, it will default to the campus team ID |
Any team ID in the following range is accepted: A-Z AA-AZ BA-BZ NOTE: the response will send the integer associated with the Team ID. In other words, A = 0, B = 1, etc. |
| permission | String | No, but if left blank, it will default to the member |
Must choose one of the following: member leader moderator admin owner NOTE: you must enter these in all lowercase. |
| sendInvitationEmail | String | No, but if left blank, it will default to “all.” |
The following options are valid: “all”- the system will send the invitation email regardless of the user’s status. "newToVirbela" - the system will only send the invitation email if the user has not signed up for any Virbela campus within the region. "newToCampus" - the system will only send the invitation to new campus users. "none" - the system will not send the invitation to any user, regardless of their status. |
| overwriteData | true / false | No, but if left blank, it will default to false | This function determines how Virbela should act if the invited user is already a campus member. Customers can overwrite the user’s data or ignore the request and not change the user’s data. |
If the request is successful, the customer should receive the following response:
Rooms treat team ID and role equally (i.e., it uses OR logic).
Retrieve all user data for a campus – GET {baseURL}/User
The user API provides a list of all users who are part of the campus. Customers can use this API as a reference tool for the Attendance API.
The request only requires the header information - no body text is needed. The optional limit and skip fields reduce the data pulled in a single request. To use this field, append the header's end in the request. For example, if the request should be limited to the first 2,000 records, use this request: {baseURL}/User?limit=2000&skip=0. To pull the following 2,000 records, use this request: {baseURL}/User?limit=2000&skip=2000. Customers can iterate through the list until the query returns no records.
The API will automatically default to 1,000 records if no limit is set. Customers can override this limit by creating a limit of greater than 1,000.
If the request is successful, the response will return a list of all users for the campus.
// status code 200

{
"responseCode": "success",
"title": "Successfully retrieved users",
"detail": "Retrieved data for 18 users in world xxxxxx",
"data": [
{
"objectId": "6DwTpLBvvX32",
"email": "angel.page@test.com",
"firstname": "Angel",
"lastname": "Page",
"displayname": "APage",
"profileLastUpdatedAt": "2023-07-21T17:47:36.593Z",
"hardware": {
"os": "Windows 10 (10.0.19044) 64bit",
"processor": "Intel(R) Core(TM) i7-9750H CPU @ 2.60GHz",
"gfx": "NVIDIA GeForce RTX 2060",
"ram": "16262",
"device": "OMEN by HP Laptop 15-dh0xxx (HP)",
"hardwareId": "{hardwareID}"
},
"teamId": "A",
"role": "admin"
},
{
"objectId": "zCzMQrfRK9FR",
"email": "Kareem.Blevins@test.com",
"firstname": "Kareem",
"lastname": "Blevins",
"displayname": "KBlevins123",
"profileLastUpdatedAt": "2023-07-13T22:24:08.641Z",
"hardware": {
"os": "Mac OS X 10.16.0",
"processor": "Intel(R) Core(TM) i7-9750H CPU @ 2.60GHz",
"gfx": "AMD Radeon Pro 5300M",
"ram": "32768",
"device": "MacBookPro16,1",
"hardwareId": "{hardwareID}"
},
"teamId": "I",
"role": "member"
},
...
],
"requestId": "635c47ad9bccbe2235d48088"
}
The User API will only return users who have accepted their invitations and will not return users whose invitations are still pending.
Retrieve individual user data – GET {baseURL}/User/{userId}
If a customer wants to pull an individual user's information, they can send a request to get that specific user's data. To use this request, the customer must enter the userId of the user they want to pull data from.
A successful response looks like this:
// status code 200

{
"responseCode": "success",
"title": "Successfully retrieved user",
"detail": "Retrieved data for user with id \"xxxxxx\" in world \"xxxxxx\".",
"data": [
{
"objectId": "zCzMQrfRK9FR",
"email": "Kareem.Blevins@test.com",
"firstname": "Kareem",
"lastname": "Blevins",
"displayname": "KBlevins123",
"profileLastUpdatedAt": "2023-07-13T22:24:08.641Z",
"hardware": {
"os": "Windows 10 (10.0.19044) 64bit",
"processor": "Intel(R) Core(TM) i7-9750H CPU @ 2.60GHz",
"gfx": "NVIDIA GeForce RTX 2060",
"ram": "16262",
"device": "OMEN by HP Laptop 15-dh0xxx (HP)",
"hardwareId": "{hardwareID}"
},
"teamId": "A",
"role": "admin"
}
],
"requestId": "635c4a1c9bccbe2235d480dc"
}
Suspend a user – POST {baseURL}/User/Membership/suspend
Suspending a user prevents them from logging into the world and is done when the user no longer needs access to the world. Suspending a user does not necessarily mean a permanent ban; the user can get reactivated anytime. Below are examples of when to suspend users:
- When a user visits the campus to attend a class, that class ends.
- When a user visits the campus for an event, the event concludes.
- When specific users should not access the campus at certain times (e.g., over the weekend).
Below is an example of the body of the request. The API uses either userId or email; if both are provided, userId takes precedence.
 {
"userId": "xxxx" ,
"email": "testuser@test.com"
}
If the request is successful, the customer should receive the following successful response:
// status code 200
{
"responseCode": "success",
"title": "Successfully updated user role",
"detail": "User with email \"testuser@test.com\" successfully updated with role \"suspended\".",
"requestId": "635c2c81d08485fe95c0f583"
}
The Suspend API prevents users from accessing the system but does not delete their data. The Delete User API deletes the user’s data.
Delete User Data – POST {baseURL}/User/Membership/deleteMember
The delete user API allows customers to delete a user from the database. If a user is a member of another campus, the API will only remove the user from the requesting campus’s member tool. However, if a user is not a member of another campus, then the user’s data is completely deleted and removed from the Virbela system.
Below is an example of the body of the request. The API requires both the userId and email.
{
"userId": "xxxx" ,
"email": "testuser@test.com"
}
If the request is successful, the customer should receive the following successful response:
// status code 200
{
"responseCode": "success",
"title": "Successfully deleted user",
"detail": "User with email \"testuser@test.com\" successfully deleted.",
"requestId": "635c2c81d08485fe95c0f583"
}
There is no way to reverse this action. If a user is deleted, their data is lost forever. The user will have to register again to participate in the campus.
APIs for member profiles
The following APIs work with the new member profile functionality that Virbela released on 09 Aug 2023.
Retrieve profile information about all users – GET {baseURL}/MemberProfile
This API will pull member profile information for all users.
The request only requires the header information. The optional limit and skip fields are query parameters that reduce the data pulled in a single request. For example, if the request should be limited to the first 2,000 records, use this request: {baseURL}/MemberProfile?limit=2000&offset=0. To pull the following 2,000 records, use this request: {baseURL}/MemberProfile?limit=2000&offset=2000. Customers can iterate through the list until the query returns no records.
There is an option order field to sort records based on a given field. For example, if there is a field called updatedAt, customers can sort by adding it to the header: {baseURL}/MemberProfile?limit=2000&offset=2000&order=-updatedAt.
The query will return results for every campus member and their complete profile information. Note that the fields differ by campus, as each campus can define what appears in the profile. If an entry for a particular field is blank for a given user, that field will not appear in the array.
{
"responseCode": "success",
"title": "Successfully retrieved member profiles",
"detail": "Retrieved 152 member profiles. Member profiles that could not be parsed
correctly have also been provided with their identifiers and parsing error details.",
"data": {
"memberProfiles": [
{
"email": "angel.page@test.com",
"firstname": "Angel",
"lastname": "Page",
"updatedAt": "2023-07-21T17:47:36.593Z"
"userId": "6DwTpLBvvX32"
},
{
"email": "Kareem.Blevins@test.com",
"firstname": "Kareem",
"lastname": "Blevins",
"Department": "Product",
"Region": "Canada",
"eNPS": 9,
"updatedAt": "2023-07-13T22:24:08.641Z"
"userId": "zCzMQrfRK9FR"
},
...
{
"email": "Dominique.Fuller@test.com",
"firstname": "Dominique",
"lastname": "Fuller",
"updatedAt": "2022-12-16T22:06:44.294Z"
"userId": "QtUMF8zsEpm8"
}
],
"count": 152
},
"requestId": "64bac7f6d3c4395dba9922b2"
}
Retrieve profile information about a specific user – GET {baseURL}/MemberProfile/{userId}
This request will return the profile information of a specific user.
The request only requires the header information - no body text is needed. To use this request, the customer must enter the userId of the user they want to pull data from.
The query will return the user’s complete profile information. Note that the fields differ by campus, as each campus can define what appears in the profile. If an entry for a particular field is blank for a given user, that field will not appear in the array.
{
"responseCode": "success",
"title": "Successfully retrieved member profile",
"detail": "Retrieved member profile for user zCzMQrfRK9FR in world yVBJTLSd4gv6.",
"data": {
"memberProfile": {
"email": "Kareem.Blevins@test.com",
"firstname": "Kareem",
"lastname": "Blevins",
"Department": "Product",
"Region": "Canada",
"eNPS": 9,
"updatedAt": "2023-07-13T22:24:08.641Z"
}
},
"requestId": "64baca429e8ff05959b8a91f"
}
Update profile information for a specific user – PUT {baseURL}/MemberProfile/{userId}
This API allows customers to update member profile information for a specific user. There are two actions that users can perform. They can edit an existing field or erase data from a current field. The former action uses the update function, while the latter uses the unset function.
For example, take this user:
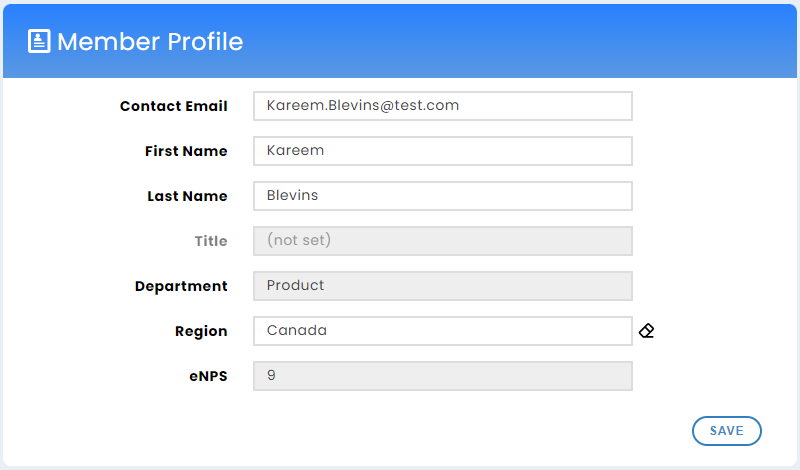
We want to update this user’s department to Product Management and their region to Alberta and erase their eNPS score.
Therefore, we will submit the following request:
{
"update": {
"Department": "Product Management" ,
"Region": "Alberta"
},
"unset": [
"eNPS"
]
}
A successful response looks like this:
{
"responseCode": "success",
"title": "Successfully updated member profile",
"detail": "Updated member profile for user zCzMQrfRK9FR in world yVBJTLSd4gv6.",
"data": {
"updatedMemberProfile": {
"email": "Kareem.Blevins@test.com",
"firstname": "Kareem",
"lastname": "Blevins",
"Department": "Product Management",
"Region": "Alberta",
"updatedAt": "2023-07-21T18:47:28.900Z"
}
},
"requestId": "64bad2c0d3c4395dba992438"
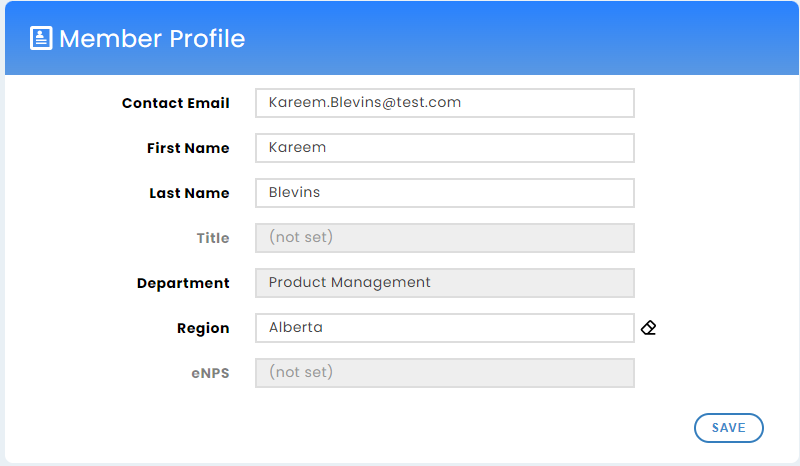
}Since we erased data from eNPS, that field no longer appears in the response.
The change is reflected in the Virbela dashboard:
If a customer wants to add a new field to a member’s profile, they must create that field in the Virbela dashboard.
Create a new private space - POST {ProductAPIURL}/api/purchase
Virbela resellers can use this API to create private spaces on their campus. This API functions the same as the space creator tool in the Virbela dashboard. Please reference this document to learn more about the functionality.
Below is what appears in the body of the request:
{
  "purchaseType": 0,
  "email": "test@gmail.com",
  "firstName": "John",
  "lastName": "Doe",
  "pricingId": 1
}
These are the different elements involved (all required):
| Element | Data Type | Description |
| purchaseType | Number | Always set the value to zero (0) |
| String | Email address of the subscriber | |
| firstName | String | First name of the subscriber |
| lastName | String | Last name of the subscriber |
| pricingId | Number | This is the ID of the room type (e.g. Office 20). Each ID is unique to a campus, so customers should reach out to their account manager for details. |
A successful response looks like the following:
{
  "id": 32,
  "purchaseType": 0,
  "remoteSystemSubscriptionId": "enterRemoteId",
  "status": 0,
  "details": "",
  "createdAt": "2021-08-13T02:56:35.385Z",
  "updatedAt": "2021-08-13T02:56:35.385Z",
  "price": {
    "id": 4,
    "name": "Standard",
    "status": 0,
    "amount": "$0.00",
    "createdAt": "2021-08-13T02:45:13.248Z",
    "updatedAt": "2021-08-13T02:45:13.248Z",
    "product": {
      "id": 5,
      "name": "Office 20",
      "description": "Office with a maximum user count of 20",
      "status": 0,
      "type": 0,
      "createdAt": "2021-08-13T02:36:11.392Z",
      "updatedAt": "2021-08-13T02:36:11.392Z"
    }
  },
  "payments": []
}
This API uses a different baseURL than the other Virbela APIs. Please reference the ProductAPIURL endpoint at the top of the page.
The response contains some extraneous data. For example, the pricing array does not reflect the price the subscriber purchased the room.
Room APIs
These APIs retrieve information about rooms in the world.
Retrieve all room data for a campus – GET {baseURL}/Rooms/World/{clientName}
The room API provides a list of all rooms available on the campus. Customers can use this API as a reference tool for the Attendance API.
The request does not require any body text, just the headers. This API requires the customer to know their clientName to submit the request, and Virbela’s staff can provide this information.
A successful response looks like the following:
// status code 200

{
"count": 16,
"data": [
{
"objectId": "KJDfj5wOjA",
"visibleOn": [
"GOTO",
"roomGraph"
],
"levelName": "theater",
"instance": 0,
"name": "Theater",
"SFSRoom": "Theater",
"createdAt": "2021-12-15T20:36:08.302Z",
"updatedAt": "2022-07-29T16:55:58.902Z"
},
{
"objectId": "CDSfj5wOkA",
"visibleOn": [
"GOTO"
],
"levelName": "workspace",
"instance": 0,
"name": "Team Suite",
"SFSRoom": "WorkRm",
"createdAt": "2021-12-15T20:36:08.485Z",
"updatedAt": "2022-07-29T16:55:58.901Z"
},
{
"objectId": "ABCfj5wOkB",
"visibleOn": [
"GOTO",
"roomGraph"
],
"levelName": "boardroomlgpro",
"instance": 33,
"customLabel": "The Future: Diversity in Tech",
"name": "The Future: Diversity in Tech",
"SFSRoom": "BoardRoomLgPro25",
"createdAt": "2022-03-03T05:03:20.932Z",
"updatedAt": "2023-02-09T17:45:39.934Z",
"groupAccess": [],
"group": "Women in Tech History",
"hardUserLimitOptions": {
"dialogTitle": "The Future: Diversity in Tech Full",
"dialogMessage": "The Future: Diversity in Tech is full; you have been sent to the campus instead."
}
},
{
"objectId": "MHPspquUJd",
"visibleOn": [
"GOTO",
"mobile",
"roomGraph"
],
"levelName": "workspace",
"instance": 121,
"customLabel": "Workspace",
"name": "Workspace",
"SFSRoom": "WorkRm888",
"createdAt": "2022-01-05T22:13:57.453Z",
"updatedAt": "2023-02-09T17:45:38.921Z",
"groupAccess": [],
"group": "Virbela Tower",
"teamAccess": [
"2",
"4",
"5"
],
"teamAccessFriendly": [
"B",
"D",
"E"
]
},
...
]
}
Data APIs
Data APIs provide insight into the usage of Virbela.
Attendance Data – GET {baseURL}/User/Attendance/Room/{roomId}
The attendance API allows customers to pull attendance data for specific rooms within their campus. This data will enable customers to understand who visited certain rooms, how long they stayed, and how long they spoke.
To use this API, the customer must provide the ID of the room they wish to pull attendance data from. Customers can use the room API to ascertain the room ID. Currently, the attendance API only supports requesting information for one room at a time.
Below is a sample request:
{{baseURL}}/User/Attendance/Room/IyaWMsAmyV?start=2023-01-19T00:00:00.000-07:00&stop=2023-01-19T23:59:59.999-07:00&limit=1000&offset=0
Below is information on the parameters included in the request:
Element |
Data Type |
Required |
Additional information |
|---|---|---|---|
| start | DateTime | Yes | ISO 8601 date string |
| stop | DateTime | Yes | ISO 8601 date string |
| limit | Integer | No, if left blank, it will default to no limit | |
| offset | Integer | No | This field allows customers to paginate through records to help limit the size of individual requests. For example, the first request could restrict the records to 1000, with an offset of 0. The following request could limit records to 1000, with an offset of 1000. |
Users can pull any date range. However, the system does limit requests to 90 days or less. In other words, if a user wants six months of data, they must make at least two requests.
The data range will return any users in the room during the indicated time frame.
In other words, consider the following users:
- User A joined the room at 2:00 PM and left the room at 4:00 PM
- User B joined the room at 2:45 PM and left the room at 3:15 PM
- User C joined the room at 2:00 PM and left the room at 3:00 PM
- User D joined the room at 3:00 PM and left the room at 4:00 PM
- User E joined the room at 1:00 PM and left the room at 1:30 PM
- User F joined the room at 4:30 PM and left the room at 5:00 PM
If the Start Time = 2:30 PM and the Stop Time = 3:30 PM, then the response will show Users A, B, C, and D as they all were in the room for some during the indicated time frame. Users E and F will not appear in the response.
The API uses the following logic:
Start time <= Room Leave Time AND Stop time >= Room Join Time
The response is as follows. It will provide a list of individual user sessions, complete with the userId, their talk minutes, their join time (in UTC), and their exit time (in UTC).
// status code 200
{
"responseCode": "success",
"title": "Successfully queried room attendance data.",
"detail": "2 attendance records were returned, please see \"data\" for records details.",
"data": [
{
"userId": "xxxxxxxx",
"joinTime": "2023-01-19T11:55:56.140+00:00",
"leaveTime": "2023-01-19T18:09:06.140+00:00",
"talkMinutes": "15.44",
"attendanceMinutes": "373.17"
},
{
"userId": "xxxxxxxx",
"joinTime": "2023-01-19T23:20:00.248+00:00",
"leaveTime": "2023-01-19T23:21:04.248+00:00",
"talkMinutes": "0.00",
"attendanceMinutes": "1.07"
}
],
"requestId": "63e66bc538edf8f934305c82"
}
Private Volume Data – GET {baseURL}/User/Attendance/PrivateVolume/{volumeId}
The private volume API allows customers to pull attendance data for specific private volumes within their campus. This data will enable customers to understand who visited certain private volumes, how long they stayed, and how long they spoke.
To use this API, the customer must provide the private volume ID of the volume they wish to pull attendance data from. Currently, the attendance API only supports requesting information for one private volume at a time.
Retrieving the private volume ID
For customers to use this API, they need to understand the private volume ID(s) of the space(s) they are interested in.
At the moment, there is only one way to find this ID. Users must enter the private volume they are interested in and enter /roominfo in the chat.
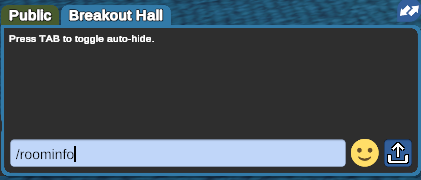
Any user, from member on up, can use the /roominfo command.
The /roominfo command will return information about the private volume in the chat. Users should take note of any information that precedes the “voice IP” information - this contains the private volume information. This ID may or may not start with “PR-”. In the example below, the private volume ID is PR-2114767535--NewCampus.

Users can write down the private volume ID, copy the chat using the right mouse key, and then paste it into a document.
Private volume IDs stay consistent, so once you copy it down, it will remain the same in the future.
However, private volume IDs do differ among like scenes. For example, a boardroom in the workspace scene will have a different ID from other boardrooms in that same workspace scene and a different ID from other boardrooms in other workspace scenes.
Sample request and response
Below is a sample request:
{{baseURL}}/User/Attendance/PrivateVolume/PR-2114767535--NewCampus?start=2023-01-19T00:00:00.000-07:00&stop=2023-01-19T23:59:59.999-07:00&limit=1000&offset=0
Below is information on the parameters included in the request:
Element |
Data Type |
Required |
Additional information |
| start |
DateTime |
Yes |
ISO 8601 date string |
| stop |
DateTime |
Yes |
ISO 8601 date string |
| limit |
Integer |
No, if left blank, it will default to no limit |
|
| offset |
Integer |
No |
This field allows customers to paginate through records to help limit the size of individual requests. For example, the first request could restrict the records to 1000, with an offset of 0. The following request could limit records to 1000, with an offset of 1000. |
Users can pull any date range. However, the system does limit requests to 90 days or less. In other words, if a user wants six months of data, they must make at least two requests.
The data range will return any users in the private volume during the indicated time frame.
In other words, consider the following users (a different scenario than above):
- User A joined the private volume at 2:00 PM and left the private volume at 4:00 PM
- User B joined the private volume at 2:45 PM and left the private volume at 3:15 PM
- User C joined the private volume at 2:00 PM and left the private volume at 3:00 PM
- User D joined the private volume at 3:00 PM and left the private volume at 4:00 PM
- User E joined the private volume at 1:00 PM and left the private volume at 1:30 PM
- User F joined the private volume at 4:30 PM and left the private volume at 5:00 PM
If the Start Time = 2:30 PM and the Duration = 1 hour, then the response will show Users A, B, C, and D as they all were in the private volume for some during the indicated time frame. Users E and F will not appear in the response.
The API uses the following logic:
Start time <= Room Leave Time AND Stop time >= Room Join Time
The response is as follows. It will provide a list of individual user sessions, complete with the userId, their talk minutes, their join time (in UTC), and their exit time (in UTC).
// status code 200
{
   "responseCode": "success",
   "title": "Successfully queried room attendance data.",
   "detail": "2 attendance records were returned, please see \"data\" for records details.",
   "data": [
       {
           "userId": "xxxxxxxx",
           "joinTime": "2023-01-19T11:55:56.140+00:00",
           "leaveTime": "2023-01-19T18:09:06.140+00:00",
           "talkMinutes": "15.44",
           "attendanceMinutes": "373.17"
       },
       {
           "userId": "xxxxxxxx",
           "joinTime": "2023-01-19T23:20:00.248+00:00",
           "leaveTime": "2023-01-19T23:21:04.248+00:00",
           "talkMinutes": "0.00",
           "attendanceMinutes": "1.07"
       }
   ],
   "requestId": "63e66bc538edf8f934305c82"
}
Waitlist APIs
Campuses that use waitlists can use these APIs to collect statistics on waitlist activities.
Retrieve waitlist called events – GET {baseURL}/Activity/Waitlist/Called
This API pulls all the waitlist-called events. This event occurs when a user on the waitlist queue is called into the support center.
The request header requires v-client-id, v-client-secret, and v-client-name (same as the client name for the attendance report).
Below is a sample request:
{{baseURL}}/Activity/Waitlist/Called?start=2023-01-19T00:00:00.000-07:00&stop=2023-01-19T23:59:59.999-07:00&limit=1000&offset=0&sfsRoom=WorkRm100
Below is information on the parameters included in the request:
| Element | Data Type | Required | Additional information |
|---|---|---|---|
| start | DateTime | Yes | ISO 8601 date string |
| stop | DateTime | Yes | ISO 8601 date string |
| limit | Integer | No, if left blank, it will default to no limit | |
| offset | Integer | No | This field allows customers to paginate through records to help limit the size of individual requests. For example, the first request could restrict the records to 1000, with an offset of 0. The following request could limit records to 1000, with an offset of 1000. |
| sfsRoom | String | No | This is the SFS server name of the room. |
A successful response looks like the following:
// status code 200

{
"responseCode": "success",
"title": "string",
"detail": "string",
"data": {
"count": 0,
"results": [
{
"userId": "string",
"room": "string",
"time": "2019-08-24T14:15:22Z",
"supportUserId": "string",
"secondsInLine": "string",
"initialPlace": "string"
}
]
}
}
Retrieve waitlist completed events – GET {baseURL}/Activity/Waitlist/HelpDone
This API pulls all the waitlist-ended events. This event occurs when a user on the waitlist has their ticket closed.
The request header requires v-client-id, v-client-secret, and v-client-name (same as the client name for the attendance report).
Below is a sample request:
{{baseURL}}/Activity/Waitlist/HelpDone?start=2023-01-19T00:00:00.000-07:00&stop=2023-01-19T23:59:59.999-07:00&limit=1000&offset=0&sfsRoom=WorkRm100
Below is information on the parameters included in the request:
| Element | Data Type | Required | Additional information |
|---|---|---|---|
| start | DateTime | Yes | ISO 8601 date string |
| stop | DateTime | Yes | ISO 8601 date string |
| limit | Integer | No, if left blank, it will default to no limit | |
| offset | Integer | No | This field allows customers to paginate through records to help limit the size of individual requests. For example, the first request could restrict the records to 1000, with an offset of 0. The following request could limit records to 1000, with an offset of 1000. |
| sfsRoom | String | No | This is the SFS server name of the room. |
A successful response looks like the following:
// status code 200

{
"responseCode": "success",
"title": "string",
"detail": "string",
"data": {
"count": 0,
"results": [
{
"userId": "string",
"room": "string",
"time": "2019-08-24T14:15:22Z",
"supportUserId": "string",
"secondsBeingHelped": "string"
}
]
}
}
Retrieve waitlist support end events – GET {baseURL}/Activity/Waitlist/SupportEnd
This API pulls all the waitlist-supportend events. This event occurs when a user agent completes their shift.
The request header requires v-client-id, v-client-secret, and v-client-name (same as the client name for the attendance report).
Below is a sample request:
{{baseURL}}/Activity/Waitlist/SupportEnd?start=2023-01-19T00:00:00.000-07:00&stop=2023-01-19T23:59:59.999-07:00&limit=1000&offset=0&sfsRoom=WorkRm100
Below is information on the parameters included in the request:
| Element | Data Type | Required | Additional information |
|---|---|---|---|
| start | DateTime | Yes | ISO 8601 date string |
| stop | DateTime | Yes | ISO 8601 date string |
| limit | Integer | No, if left blank, it will default to no limit | |
| offset | Integer | No | This field allows customers to paginate through records to help limit the size of individual requests. For example, the first request could restrict the records to 1000, with an offset of 0. The following request could limit records to 1000, with an offset of 1000. |
| sfsRoom | String | No | This is the SFS server name of the room. |
A successful response looks like the following:
// status code 200

{
"responseCode": "success",
"title": "string",
"detail": "string",
"data": {
"count": 0,
"results": [
{
"userId": "string",
"room": "string",
"time": "2019-08-24T14:15:22Z",
"numUsersHelped": "string",
"secondsHelpingUsers": "string",
"secondsSupportingList": "string"
}
]
}
}