
Getting Around
Moving your Avatar
Use the arrow keys or click on the ground to move your avatar.
(WASD keys also work)
Changing Rooms
Click the GO TO menu in the top right and select a new room in the “Other Rooms” section

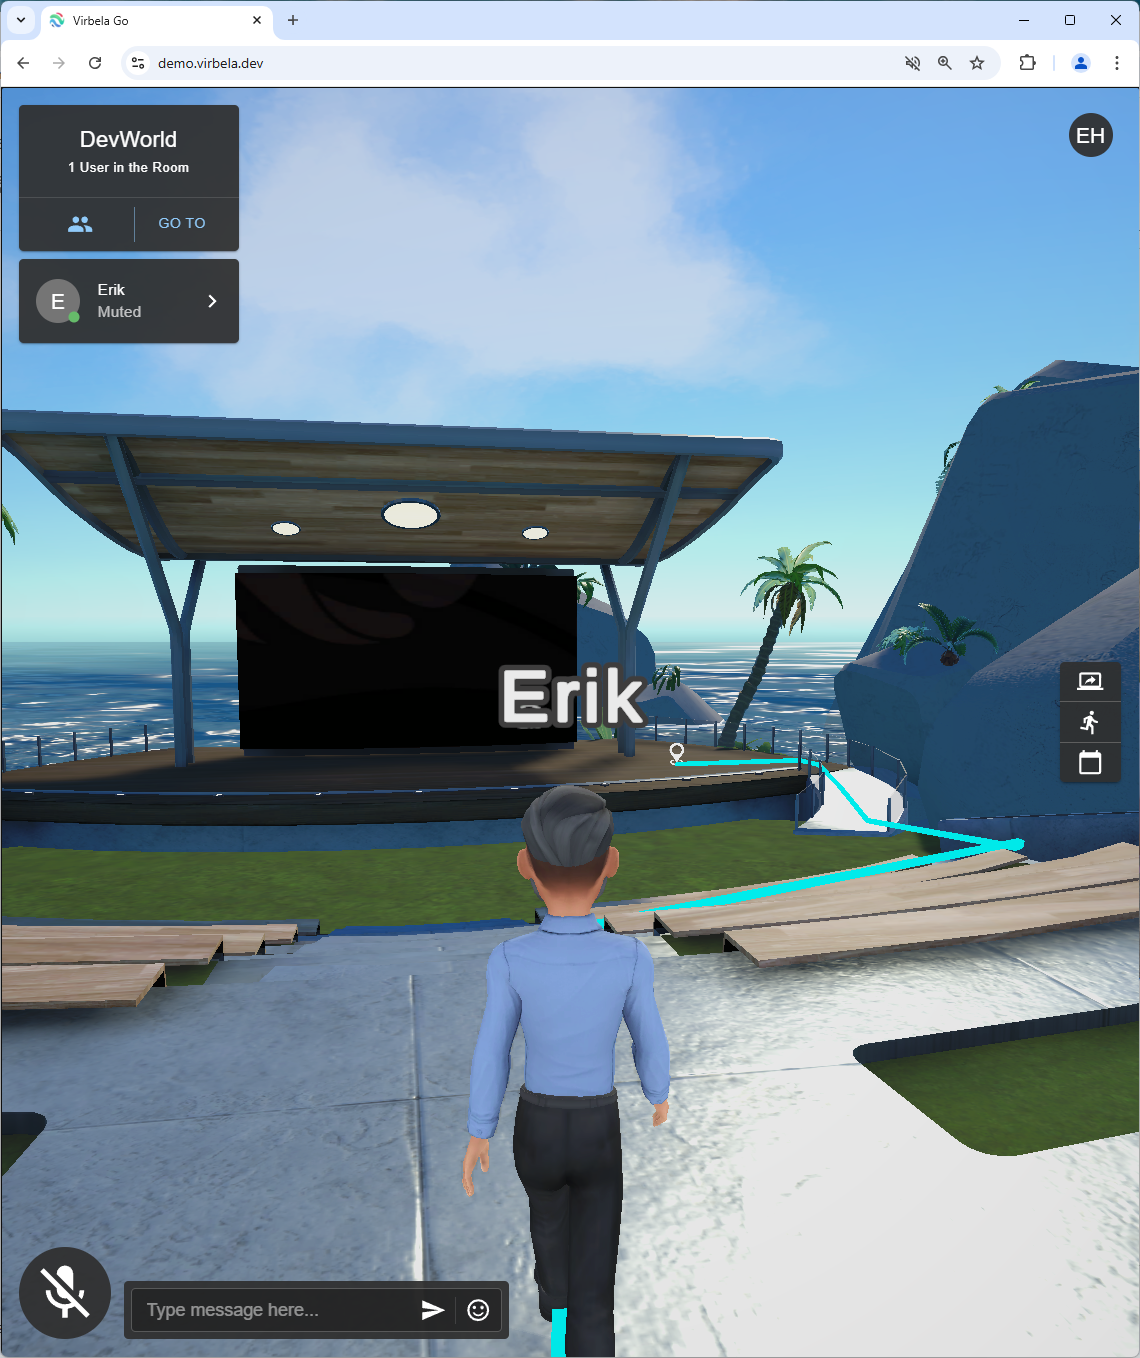
Changing Locations within a Room
Click the GO TO menu button, available locations will show up in the top “In Current Room” section

Screen/Webcam Sharing
When you are in spaces that allow Screensharing and/or Webcam sharing, buttons will appear in the bottom left side of your screen

Share Webcam
Click the camera button to start a webcam share. All users in “your area” will be able to view the webcam share

When your share is active the icon will be green. Click again to stop the share.

Screenshare
Click the screenshare button to start a screenshare. All users in “your area” will be able to view the screenshare

When your share is active the icon will be green. Click again to stop the share.

ℹ️ To share audio with your Screenshare, select a Chrome tab or Entire Screen and make sure the “Share audio” toggle is set on
Viewing Shares
When a share starts in your area, it will automatically display in a window in the top right of your screen.
Resize the window by dragging the bottom left corner.

Simultaneous Shares
The most recent screenshare will take precedence in the share window. When multiple shares are active in your area, the menu button on the left of the share window header can be clicked to reveal the list of active shares. Click an entry to view that share.

Web Cam View
As users share their web cams their video streams are added to the Web Cams section of the Share Window. 16 Shares will be shown at a time. If more than 16 shares are active, then multiple pages will be shown and arrow buttons will appear in the top toolbar to switch between them. Each web cam can be made full screen or popped out into “Picture in Picture” mode via controls at the bottom of each video stream window.
When a screenshare becomes active in the current area, it will take priority over the Web Cam screen. Users can switch back to the Web Cam view via the menu drop down shown above with the label “Web Cams”
ℹ️ Currently only one screenshare can be viewed at a time.
ℹ️ Individual users can share both their screen and their webcam at the same time
Additional Controls
Open in New Window
Click the Open in New Window button to move the share into a separate window.

ℹ️ This window can be resized and moved. Closing it will restore the video stream to its original location.
Hide Window
This hides the share view, but keeps your share(s) active.

When hidden the window will collapse into an icon in the top right corner and display how many active shares there are.

Close Window
This closes the window and stops any active shares you have.

Room Customization
Image Boards
Edit an image board by clicking on the board.
Upload a file with the Upload File button and click Apply.

ℹ️ Drag and Drop images into the Edit Image Board panel above or paste them from the clipboard for quick application.
ℹ️ If you choose to use an existing URL instead of uploading a file, then the image source must have an open CORS policy. Some services such as imgur.com have open CORS policies that will work in world. Images hosted on uploads.virbela.com will also work.
ℹ️ Image URLs must end in an image extension. (Examples: .jpg, .png)
Open URL when clicking on an image board
Click the checkbox to apply a clickable URL to the image board.

When a valid link is applied here, then users who click the board will open the specified link in a new tab.
Text Boards
Edit a text board by clicking on the board.
Type in new text and click Apply.

Voice Communication
How to speak to others
Open your Microphone
Click the Microphone button in the bottom left corner of the screen.

ℹ️ Your browser will likely ask if the app can have permission to use the Microphone. You must agree to this to use the Microphone in the world
Push-To-Talk
If you prefer a walkie-talkie style interaction with the microphone, you can hold down the `/~ key to open the microphone while the key is held down
Headsets
Headsets are not required. We believe the echo cancellation system is good enough for headsets to not be required.
Voice Isolation
We are using an AI based voice isolation solution which blocks out background noise and attempts to only transmit voice audio (keyboard clacking, dogs barking, kids screaming, city noise should all be blocked)
⚠️ If you attempt to transmit audio that is not voice (like music), the voice isolation system may prevent clear transmission. We will add a way to disable this system in the future.
Text Chat
Type a message in the input field that says “Type message here…”.
Click the Send button or hit Enter to submit the message.
Your message will be received by everyone listed in “Your area” in the user list.

ℹ️ Multi-line Support: Hold Ctrl or Cmd while hitting Enter to add a new line to your message
Emoji
Click the smiley face emoji button to add an emoji to your chat.
Click on an Emoji to add it.

ℹ️ Search functionality is only available in English at this time.
Emoji Reactions
Hover over a chat message and a blue reaction button will appear.
Click to select a reaction to attach to the message

ℹ️ Click the + button to show the full set of emoji
ℹ️ Hover over reactions to see who has added them. Click to add the same reaction.
Chat Links
URLs added to text messages will be converted into clickable links.
You do not need to specify http(s):// in front of your links.
Example: “Check out google.com” would turn “google.com” into a clickable link.

ℹ️ Clicking on links to locations in the world will allow users to quickly jump there by clicking the link
Chat Images
Images can be sent to users in the chat box.
If a chat only consists of a link to an image, then the image will display in the chat box.
You can upload, drag and drop or paste an image file from the clipboard to share images.

Chat Resize
The Chat window can be resized by dragging the top right corner.

Hide Chat Window
Click the x button to hide the chat window.


When hidden the chat window will collapse into an icon that will display how many messages have been missed while it has been closed.

Avatar Customization
Click on the account button with your initials in the top right corner and click Avatar.

Use the arrow buttons to select a body type

Then, click on color swatches to adjust colors for each category you desire.

Click Done to save your selections.

⚠️ If you make color selections and then change body types, your color selections will be lost.
Avatar Animations
Click the running avatar button on the right side menu and select an animation from the list

Or hit the 1-8 buttons on your keyboard
ℹ️ The 3 key isn’t currently mapped to an animation
Localization
Change UI Language
Click on the account button with your initials in the top right corner and click Settings.
Select the UI Language dropdown and select your desired language.
ℹ️ English, Spanish, French and Japanese are the only available languages at this time
ℹ️ If your desired language is not yet available, Google Translate is another option to translate the UI.
Admin Tools
Broadcast
Advanced rights users can broadcast messages to all users in a Room or across the World.
Click Admin Tools → Broadcast from the Side Action Panel


Select whether you'd like to broadcast the message to the Current Room or to everyone in the World.
(The name of the current room will display as the Destination for the Room Broadcast)

Type your message and click Apply

Your message will display front and center in the users' views and will be signed with your name.

ℹ️ Paste in URLs and they will become clickable links. If you share a link to an area in world, that is a quick way for users to jump to that location.
Find Users
Advanced rights users can locate all users in the world.
Click Admin Tools → Find Users from the Side Action Panel

All rooms that aren't the requester's room are clickable links that can be used to quickly jump to those rooms.

Click the arrow buttons next to the header labels to sort the list by Name or Room.

The total number of users in the world is displayed in the bottom footer (shown in red below) as well as controls to move to secondary pages when there are more users than can display on the first page.

Bots
Create bots
The following command can be run to add avatar bots to a scene. The bot will be added at the location of your current avatar.
ℹ️ These are server-side bots, so everyone in the room will see the bots
Basic command (Create a random bot with a random gender neutral name)
/create-bot
Bot with name
/create-bot -n "Your name here"
Bot with chosen body
/create-bot -n "Your name here" --body "Male_Light1"
ℹ️ Available body types are: "Male_Light1", "Male_Light2", "Male_Mid1", "Male_Mid2", "Male_Dark1", "Male_Dark2", "Neutral_Light1", "Neutral_Light2", "Neutral_Mid1", "Neutral_Mid2", "Neutral_Dark1", "Neutral_Dark2", "Female_Light1", "Female_Light2", "Female_Mid1", "Female_Mid2", "Female_Dark1", "Female_Dark2"
Bot with chosen colors (colors specifed by hex codes)
/create-bot -n Fred --body Male_Light2 --hair-colors 262626,53442D --face-colors C79C7D,FF0000,A97369 --topwear-colors 7C90BC --bottomwear-colors 323232,323232,323232,323232 --shoe-colors 323232,323232,323232,323232
ℹ️ Colors are specified as hex values (rrggbb) without the leading #
ℹ️ Face Colors are specified as: skin, eyes, lips
Bot from avatar (create a bot exactly like another avatar)
/print-bot-clone-command <bot-or-user-name>
This will print a /create-bot command to the console that matches the user's avatar definition. You can then run this command to generate a clone.
Edit/Remove bots
Edit a bot (change the appearance of an existing bot)
/edit-bot -n Amy --topwear-colors FF90BC
The example above will change Amy's shirt to pink.
You can use any of the arguments above for create-bot, you just need to make sure to specify the name of the bot so the system knows which one to change.
Remove a bot
/remove-bot -n "Amy"
Remove all bots
/remove-bots
Bot Commands
Sit a bot
/bot-command -n Fred --sit nearest
Will force the bot named "Fred" to sit in the nearest seat to you
/bot-command -n Fred --sit random
Will force the bot named "Fred" to sit in a random seat in the scene
Stand a bot
/bot-command -n Fred --stand
If sitting, this will force the bot named "Fred" to stand
Re-position a bot
/bot-command -n Fred --reposition
Will move the bot named "Fred" to your current position
Make a bot persistent
/bot-command -n Fred -p
Will make "Fred" live in the room even after all users leave.
Create multiple bots within a radius
/create-bots -c 10 -r 5
This will create 10 bots randomly positioned within a radius of 5 units from your avatar.
ℹ️ If you are creating a bunch of bots in specified locations, you can use some keyboard shortcuts.
- Hit Enter (to focus the chat box)
- /create-bot
- Hit Enter (to execute the command)
- Hit Escape (to release focus)
- Move your avatar to the next position for the next bot
- Hit Enter (to focus)
- Hit the up arrow to recall the last command
- Hit Enter (to execute the command)
- Repeat as needed
Additional Commands
Freelook camera
/freelook
ℹ️ After executing /freelook hit Esc to release focus from the chatbox. Then you can use the mouse and WASDEQ to move the camera around. Holding Shift will speed up the movement.
Toggle names over avatars' heads
/namevis -h
This hides avatar nameplates over users and bots from view (-h for “hide”)
/namevis
This restores nameplates into view