
Web Boards
A Web Board may be used to display presentations, static graphics, web pages, videos, screen shares, or to share a web camera. Users who are provided the correct permission levels can use the web boards. If you are unable to access the web board tools, contact your campus administrator. Web Boards function similarly to web browsers. The content displayed on these boards can be changed as easily as navigating to a website; all users in the vicinity will be able to see the changes you make.
Note: Other users are not able to see website content if you are logged into an account. For example, if you log in to a private Google Slide presentation, other users will only see a login screen. Website content must be publicly viewable to be shared.
Presentation Tool
To use a Web Board, click on it to open the Presentation Tool. The Presentation Tool will appear in the bottom right corner of the Virbela screen. It works like a URL address bar — type a URL and the Web Board will display the link’s content, allowing anyone in the same Privacy Volume to see the content at the same time. When using the Web Board for a presentation, select the three lines at the far right side of the Presentation Tool.
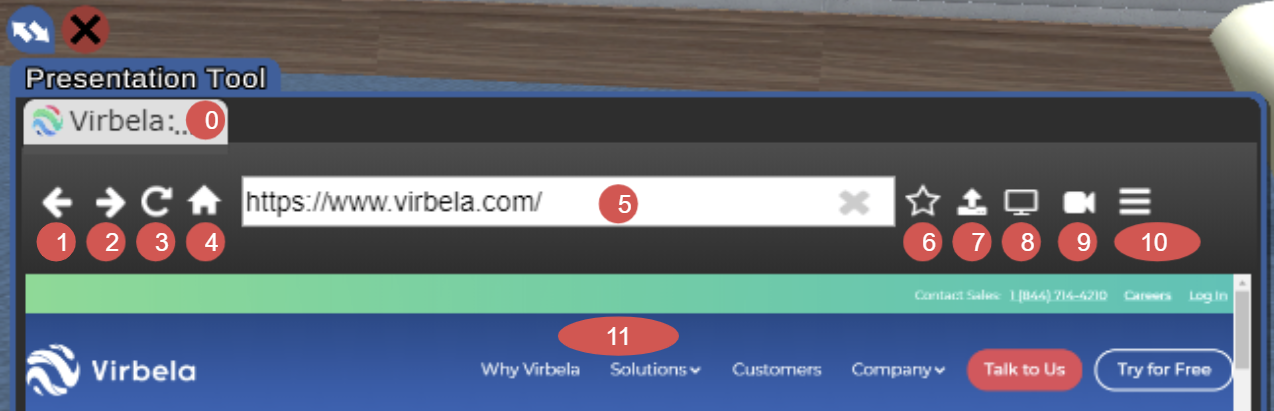
| Legend | ||
| 0 | Bookmark Tabs | Retrieve previously Bookmarked content |
| 1 | Page Back | Traditional Browser options to return to a Previous Page |
| 2 | Page Forward | Traditional Browser options to go to the Next Page |
| 3 | Refresh | Traditional Browser Options to Refresh |
| 4 | Home | Takes you to the default Google page |
| 5 | Address Bar | URL Address Bar |
| 6 | Star Button | You can bookmark the pages you visit by clicking on the “Star” icon next to the address bar. This also applies to any files or presentations you upload to the presentation board. The bookmarked pages will appear as separate tabs at the top of the toolbar referenced by the number 0. Select a tab to bring that page back up on the screen. Select a tab to bring that page back up on the screen. |
| 7 | File Upload Tool | The file upload tool allows you to upload files directly onto a presentation board. PDF and PPTX* files will open in a slideshow format, allowing you to advance or backtrack through slides. However, uploading files in these formats takes a bit longer to complete. File Upload Guidelines: Format, File Type, Size Limit Single File Type: .bmp, .gif, .jpg, or .png 1500px x 1500px Multi-Page File Type: .pdf, .pptx, .ppt 30MB Video File Type: WebM or .MP4 30mb (Max 1080p) |
| 8 | Screen Share Tool | The screen share button will allow you to display what is on your personal computer screen on a presentation board for all to see. Once you click on the screen icon to activate it, a window will pop up asking if you would like to share your screen. Once you click “Yes” your screen should start to display. |
| 9 | WebCam Tool | To activate your webcam, click on the presentation board you would like to use and select “Share your webcam” in the toolbar. You will get a prompt to share your webcam. Hit "OK" to allow. To stop sharing your webcam, click the camera icon again. |
| 10 | More Options | There are more options found at the far right of the toolbar and allow you to do the following: Switch to the Presenter Tool mode: This allows you to view web screen activity while facing the audience. You can adjust the size by clicking and dragging the resize button (blue circle with arrows on the upper left side). Click the red “X” to hide the presentation tool. Take ownership and remove ownership of the board: to prevent other users from manipulating the screen, take ownership of the board. If a board has ownership, mouse clicks will be restricted to the presenter. Zoom in / out: this allows you to zoom in/out on the screen you are using.eb Board ID: A number used to track which presentation board is which." |
| 11 | Screen | The Presentation Tool allows the user to look at the content on the Presentation Screen and their audience simultaneously. |
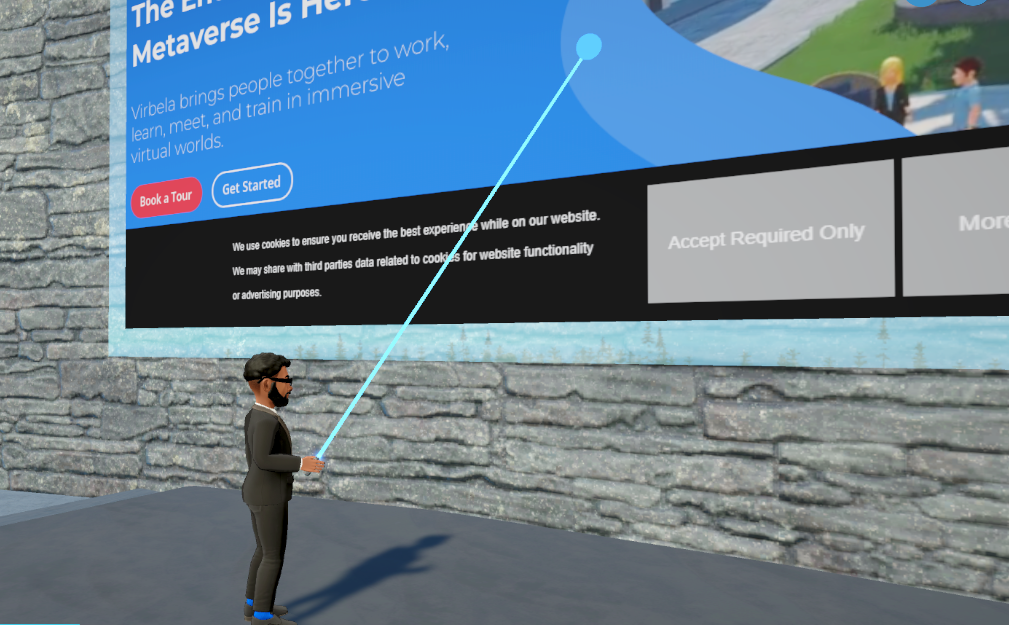
Laser Pointer
The Laser Pointer can be activated by pressing the number 2 key on your keyboard. Much like laser pointers in real life, the Virbela laser pointer allows you to point to objects on the presentation boards. However, laser pointers in Virbela Worlds only work on presentation boards, and their color matches the color of your nameplate, which allows you to identify who is pointing where. To put the Laser Pointer away, press the number 2 key again.
Sharing Documents and Gsuite Files on a Web Board
Document Visibility
Presentation Boards can be navigated just like your typical web browsers. This means that you can navigate to and use most utilities that are browser-based, like Google Docs. Generally, if you have to log into a website on a presentation board, other users will not be able to see it. You may find that when you paste a link to a Google Doc (Slides, Sheets, Docs, etc.) other users cannot see what you see. In order to allow other people to see your docs, you must set the ‘Share’ settings.
Sharing with Everyone:
- Open the Google Doc, sheet, or slide in your browser.
- Open the File drop-down menu at the top left of the screen.
- Select ‘Publish to Web’ from the drop-down menu.
- Select your custom settings and click ‘Publish’.
Note: When uploading a Google Slide file to the web, there will be additional options such as setting the time between slides and if it will restart after the last slide. For any other file type, it will give you the option to publish to a web URL link or an embedded link for web pages. For Usage in Virbela, publish the file as a link.
Sharing a Private Group
- Open the Google Doc, sheet, or slide in your browser.
- Click the blue ‘Share’ button at the top right of your Google Doc.
- Click on ‘Get Link’ and then on where it says ‘Restricted’ and change to ‘Anyone with the link&rsquo
- If you want to edit the document from within Virbela, click on ‘Viewer’ and then change it to ‘Editor’. If not you can leave it on ‘Viewer’.
- Copy the link to ‘Paste’ into a ‘Presentation Screen’.
- Click the blue ‘Done’ button to finish.
Using Video in Virbela
If you have a video that you would like to view in Virbela, you can do so by posting the video's URL in the URL bar of any presentation board. Video can be viewed from any presentation board in Virbela, but some features might function a little differently than they do in your computer's web browser. Virbela is configured to be compatible with Youtube specifically, so some features with other streaming programs may not work properly; however, so long as the video in question is formatted in WebM, there shouldn't be any problems playing your desired media in Virbela.
Fullscreen
Clicking the fullscreen button on a Youtube video normally fits the video to the boundaries of your computer monitor, but in Virbela, doing so will only fit the video to the boundaries of the presentation board. Making the video fullscreen is as simple as clicking the magnifying glass to zoom in to the presentation board, just like you would for any other webpage
Pause and Play
When a public Youtube video is posted to one of the presentation boards, the video will fill the presentation board and begin playing automatically. This will be the same for everyone in the vicinity of the presentation board playing the video.
We designed this feature to give presenters the ability to show a video to a room of people and ensure that everyone is watching the same video at the same time.
Everyone who intends to watch the video needs to be present at the time the video is started. If someone enters a room after a video has already started playing on a presentation board, then the video will start from the beginning from their point of view, even though it continues uninterrupted for everyone else. You can also pause the video on your screen and it will be paused for everyone else watching the same video.
Upload Delay
You may want to upload videos of your own to Youtube for creating your own presentation materials. There are a number of ways to do this and Youtube has a multitude of helpful articles on the topic; however, videos uploaded to Youtube will not be immediately available for use on presentation boards in the Virbela world. Youtube must convert the video to the proper format (WebM) before the video will work in Virbela and this process usually takes a few days. Your video will likely show an error message like "The video you've requested is not available or cannot be loaded" until Youtube has finished conversion.
Live Video and Live Streams in Virbela
Playing a live video on a Presentation Screen is exactly the same as playing a normal video. To show the stream on the board, enter the link for the live stream (YouTube, Twitch, or Vimeo) into the URL address bar of the Presentation Tool and hit enter. The link will open the video in real-time on the board for all users in the area to see. Youtube live streaming is fully supported within Virbela and is the recommended site for live streaming within Virbela.
Note: Owners of the Presentation Board can interact with the video as if it were a normal link. If you pause the live stream it will only pause the stream on the board itself. The stream will continue and unpausing will cause the video to NOT resume where you paused it.
YouTube is the only platform with play state synchronization, meaning when a video is paused/played by the presenter, the audience all see the video pause/play at the same spot. If someone leaves the room and comes back, the video is still synced with the rest of the viewers and continues to play (similar to real-world presentations). Users that have permission to click* on the web board will be able to control the volume individually/locally to their computer (These permission levels are Moderator and above by default).
Presenting live with a webcam can be done by setting up a live stream on YouTube and playing that live stream on YouTube and playing that live stream on a web board in Virbela. For setting up live events such as concerts or live performances, streaming live to YouTube is the easiest way to broadcast that content into Virbela.
Learn more about setting up a live stream by visiting our Recording and Streaming with OBS (PC) Article.
Tips: Preparing for a Presentation
Bookmarking Tabs for Easy Access
Before a presentation, it is a good idea to bookmark the URLs that you would like to use, so they can be quickly loaded onto a presentation screen.
For example:
Let's say you have 3 URLs that you would like to use for a presentation:
- Google Slides
- A youtube video
- A web page with additional resources
Before the presentation, you can bookmark all of these resources.
To Bookmark a URL:
- Load the URL on a board (See Presentation Screen Overview and Tools)
- Click the star to the right of the address bar.
This will create tabs that act as shortcuts to load that URL on any board you encounter.
When you are ready to present, click on the board, click on your first bookmark, and your first page will load. When you are ready for your next reference, click on the tab that represents the next reference.
You can use the back button or the bookmark tab again to return to the previous material.
Audience Communication
Prepare your audience ahead of time by communicating details such as expected behavior, how to find support, and navigating around the campus.
Presentation Content
Prior to the event, ensure your content is ready to go and loaded or entered into the presentation board. Allow 5-10 minutes to upload files. For larger files, more time may be necessary. Share content with your audience following the event by sending them the link right from the presentation board. This link will work in any browser. You can also share an event handout with an overview of the presentation.
Presenter and Organizational Staff
Who will manage the presentation boards and stage controls? For more intricate and formal presentations, consider assigning tasks to a non-presenting staff member. This will enable speakers to focus on their message while someone advances slides and manages the stage controls. Use the laser pointer by pressing the “2” key on your keyboard and using your mouse to point at the presentation boards. Pressing “2” again will deactivate the laser pointer.
Stage Controls
While on stage, click “Turn on Forced Seating”. This will place users in a seat when they teleport into the room. They are free to stand up and move about and are not permanently forced to sit in their original seat. Click “Mute Audience” to turn off everyone’s microphones, except those presenting on stage. Let your audience know they are intentionally being muted.
Recording Video
Assigning ”Camera” duties to a dedicated videographer is helpful and oftentimes necessary to ensure a flawless recording. Practice and conduct a test recording to ensure audio is captured clearly. Make sure the device has enough storage space on the videographer’s machine.
How to Record: PC
Tips: Day of Presentation
Start with a clean slate. Restart your computer before entering the campus to end any extra processes that may be running. Before you log in, shut down all other programs running on the computer in the background. This also clears your memory for optimum operational ability. We usually recommend a speaker use a wired headset to eliminate any audio feedback - especially if there are multiple presenters.
- A presenter should plan on a dry run of the event 30 minutes prior.
- Engage with the audience after some time has lapsed to ensure they are done.
- Take attendance by entering the command '/attendance' in the chatbox.
- Soundcheck: Check your audio and microphone. If your microphone is red or yellow, you can reinitialize your microphone in the settings icon.
- Using the chatbox: Next to the microphone button, you will see a chatbox, which can be used to share a written message or file with those around you.
- Click the “+” icon on the screen to enlarge the web screen.
How to Make a Room or Full Campus Announcement
Broadcasts are useful for announcing important information, such as the start of a lecture or meeting.
Note: Only facilitator and administrator-type accounts can make broadcasts
Regular text chat messages are only viewable by users in the same room as the sender. Broadcast messages are sent across all rooms on the campus. Additionally, instead of being in the chat log, broadcasts are displayed across the center of the screen.
Open the GO TO menu in the top right corner, and open the dropdown under your username. The broadcast message option is near the bottom of the drop-down list. Clicking the broadcast option will enter “/broadcast” into the chat bar. Type or paste what you would like to broadcast into the chat bar.
Alternatively, you can type “/broadcast” directly into the chat bar before typing your message.
Note: Leave a space between “/broadcast” and the beginning of your message.
Send your message to create a dismissible window viewable by all users on the campus.
Interacting with the Audience via Chat
-
Before Presentation
- 10 to 15 mins before a presentation, ask your audience questions. Let them know at the start that you will be randomly calling on them with questions throughout the session.
-
During Presentation
- During the presentation, you can use the chat to re-engage the audience by giving them something to do. Use the chat feature for real-time Q&A. Ask a question on the screen and have people respond in chat. Set up a clickable poll or invite people to use the ‘raise hand’ feature to respond to a question.
Tips: Following the Presentation
Capturing the Chat Log
Immediately following the presentation, and before you leave the room, copy the transcript from the public chat for your records. Right-click over the chat text and then paste it into a document. Gather feedback and insights by inviting your audience to participate in a survey.